
Guide To Safely Operating A Mobility Scooter
11 min read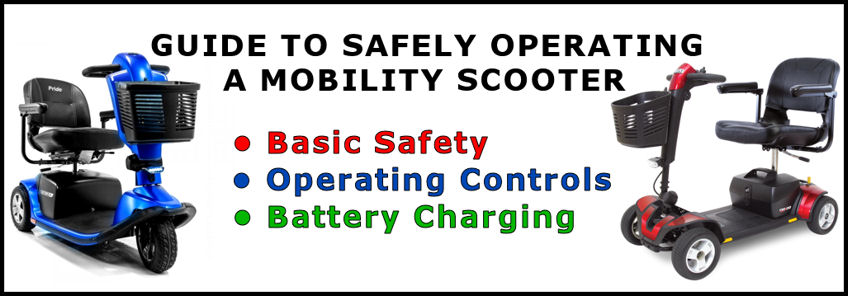
My Guide To Safely Operating a Mobility Scooter is an important topic. Learning a few key elements is vital for your safety, as well as for those around you. Therefore it’s imperative to check out all the features and operating controls before using the ECV.
Choosing A Four-Wheel Or Three-Wheel Mobility Scooter
Mobility scooters are effortless to operate. To begin with, you can get them in four or three-wheel configurations. Four-wheel models are touted as being more stable but require a bigger turning radius. As a result, they are harder to maneuver in tight quarters. However, three-wheel scooters are more suitable, especially in confined spaces. Of course, it would be beneficial if using an ECV on a Disney Cruise ship!
For example, you’ll be making quite a few tight turns. You’ll encounter this mainly in the ride and attractions lines. In my opinion, you’d be better off with a three-wheel model. I feel that they’re just as stable unless you like to drive like a maniac and take sharp corners at higher speeds! Hence, you have to go responsibly!
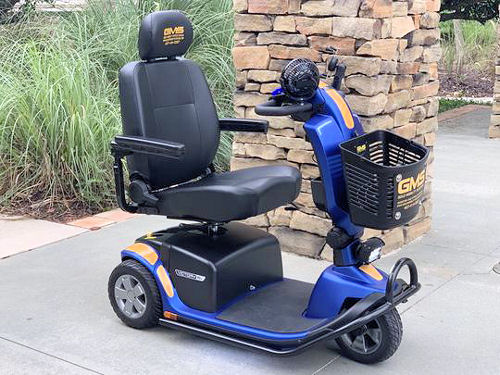

Pride “Victory 10” Mobility Scooter
My experience has been renting and using a “Victory 10” Three-Wheel Mobility Scooter. Pride Mobility is the manufacturer, and I rented the unit from Gold Mobility Scooters. Incidentally, I did my homework before renting this model. I found it to be “approved” for use with all Disney transportation modes and other Gold Mobility Scooters equipment.
Accordingly, I know it’s a stretch, but most scooters should operate similarly. Of course, some ECVs are fancier, better equipped with more options than others, and vary in sizes and weight capacities, along with different colors and designs. However, the most important thing to remember is that the scooter cannot exceed 30 inches wide by 48 inches long to access most options of the Disney Transportation System. Future posts will explain more about requirements relating to each of the four modes of Disney World transportation.
My blog post should not replace the information contained in the manufacturers’ original Owner’s Manual. In the meantime, I’ll condense this information into primary sections relating to Basic Safety, Operating Controls, and Battery Charging, making it easier to read.
Also, I’ll copy and post segments from an informative “Mobility Scooter Attraction Guide” that Gold Mobility Scooters published a few years ago. Both sources of information will help you learn about operating a mobility scooter safely!
A Little Story, Funny And Very True
I was sitting in the Port Orleans Riverside Resort lobby a while back, waiting for my scooter delivery from Gold Mobility Scooters. I had arrived earlier than expected and was just people-watching. At that time, other scooter companies were dropping off their scooters with the Bell Captains at the Resorts and leaving. Customers would later claim their unit whenever they got there. Consequently, no one was there to describe how to operate the ECV.
Well, one guy came in to claim his rental from the Bell Captain. In brief, after finding out which was his, he just got onto the scooter, turned the key, pulled the throttle lever, and promptly lost control! Subsequently, he ran right into the wall at high speed! Fortunately, he wasn’t hurt (except for his pride) and didn’t run into anyone. It appeared the speed control dial was at the highest level. It was a classic example of not operating a mobility scooter safely!! Ensure you are aware of the controls at all times, so nothing happens to you like this!
Basic Safety
Safely Operating A Mobility Scooter When Navigating Curbs
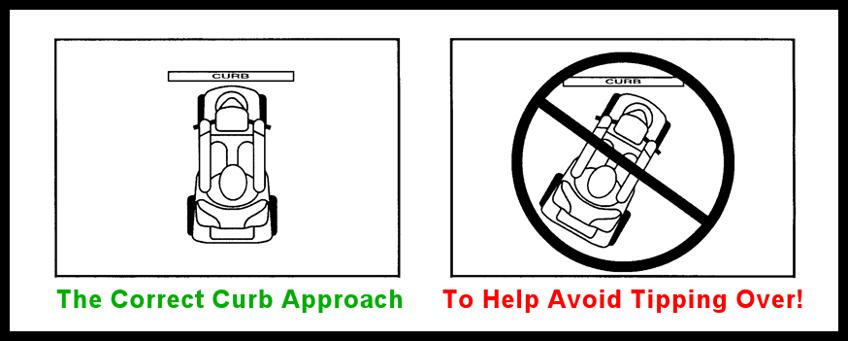
WARNING! Be sure you operate your mobility scooter perpendicular to any curb that you may be required to ascend or descend. It will help you to avoid tipping over! See the illustration below.
WARNING! Even though your scooter may be capable of handling more significant obstacles, you should not attempt to go up or down a curb that is higher than 2″ (5 cm). Doing so could cause instability in your scooter.
Auto Brake On Mobility Scooters
The brake automatically kicks in, thus preventing further momentum roll or back roll whenever the scooter is stopped (even when it’s shut off). When you use the throttle (either to move forward or backward), the brake will automatically release. You may notice a split-second delay each time before movement; this is normal for your safety.
Speed Level Control
The top speed of most scooters is about 4-6 mph, but there are always exceptions. (But we will go with the average for this example.) However, the average walking rate is 2-3 mph (perhaps slower if admiring the scenery or strolling.) Accordingly, to maintain a position with members of your party, you can manually adjust the speed until you are at the desired pace. Speed control is an important matter relating to operating a mobility scooter safely!
Safely Operating A Mobility Scooter While Cornering
Excessive high cornering speeds can create the possibility of tipping. Other factors that could affect the chance of tipping include, but are not limited to, steering angle (how sharply you turn), uneven road surfaces, and inclined road surfaces—also, riding from an area of low traction to high resistance (such as passing from a grassy area to a paved area – especially at high speed while turning) and abrupt directional changes. Therefore, do not take corners at high speed. If you feel that you may tip over in a corner, reduce your speed and steering angle (i.e., lessen the sharpness of the turn) to prevent your scooter from tipping.
Safely Operating A Mobility Scooter On Outdoor Driving Surfaces
Your scooter will provide optimum stability under usual driving conditions—dry, level surfaces composed of concrete, blacktop, or asphalt. However, there will be times when you will encounter other surface types. Feel free to use your scooter safely on lawns and in park areas. Your ECV can perform admirably on packed soil, grass, and gravel. Above all, don’t drive on uneven terrain or soft surfaces like sand.
Additionally, avoid driving in tall grass that could become tangled in the running gear. Last but not least, never go near the edge of a stream, lake, or other water body. If you feel unsure about a driving surface, avoid that surface. In the first place, this is not an ATV (all-terrain vehicle), so use common sense and venture accordingly!
Tips For Safely Operating A Mobility Scooter In Inclement Weather
Would you please avoid using your scooter and exposing it to inclement weather whenever possible? This blog talks about using an ECV in Florida, where rain and heat are not a problem. Yeah, right! I just wanted to see if you were paying attention!! Yes, you will get caught up in the many pop-up rain showers. Gold Mobility will provide you with shower caps (console covers) to cover the tiller console controls in the event of rain or the threat of bad weather. Use them; that’s their purpose!
GMS will also give you ponchos to use. They are big enough to cover you and a good part of the scooter. The sensible thing to do is seek shelter until the rain has passed. There are many overhangs, hallways, and indoor attractions that you could utilize to get out of the wet weather!
The electrical components are the most critical portion of the ECV. The scooter’s electronic components will malfunction when exposed to rain, and a safety shutdown mode will prevent operation until ALL of the electrical parts dry out.
The heat should not be a problem, except if you leave the scooter in the hot sun for a while and then attempt to sit back down on the seat. You will burn your butt and legs if wearing shorts, so bring a towel to lay on the chair before sitting down. Just use common sense. Remember, your head is not only a hatrack.
Operating Controls
Mobility Scooter Steering Column And Adjustable Tiller

Most ECVs have a pivoting adjustable tiller (also called a steering column) that allows the user to adjust the angle for maximum comfort. It’s easy to angle it closer or further away from you using an adjustable knob. It’s near the bottom of the steering column. While supporting the tiller, turn the adjustment knob counterclockwise to loosen it while adjusting to a more comfortable position. Lastly, turn the adjustment knob clockwise to secure it in place.
WARNING! Remove the key from the key switch before adjusting the tiller. Also, never attempt to change the tiller while the scooter is in motion.
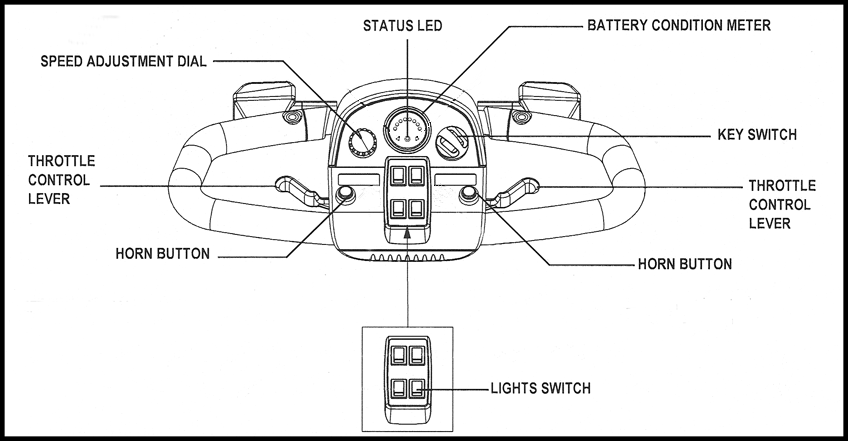
The Mobility Scooter Tiller Console Equipped With Delta Tiller Handle
The tiller console houses all the controls needed to operate your scooter, including the speed adjustment dial, key switch, battery condition meter, status LED, horn buttons, lights switch, and throttle control levers.
The Delta Tiller Handle was standard on the Pride Victory 10 Mobility Scooter I rented. It’s a wrap-around style handle that minimizes strain on the hands and allows the wrists to rest on the handle. It also allows for both left and right-handed operations. Additionally, this is the best type if you have limited hand strength or ability. Please reference the image below to view the handle and the console controls.
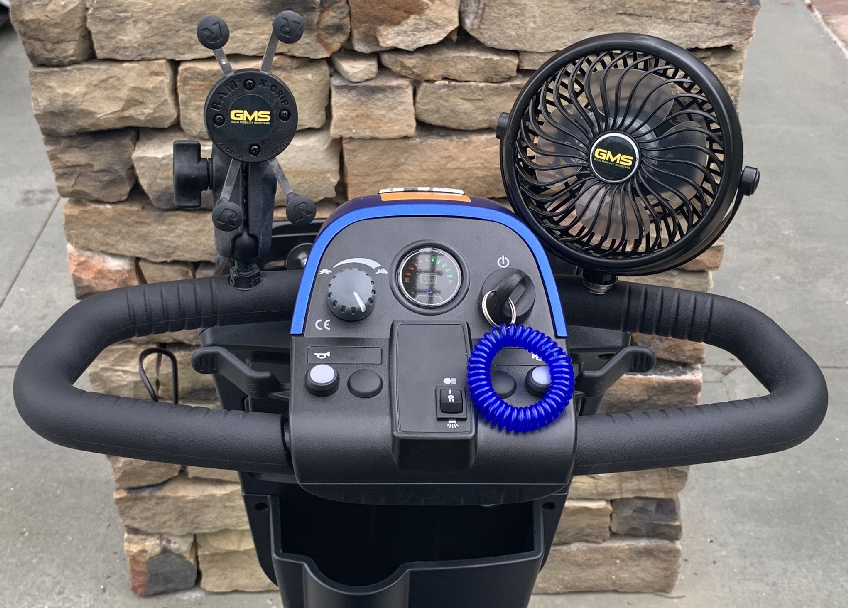
Speed Adjustment Dial
This dial allows you to preselect and limit your scooter’s top speed. For example, the image of the tortoise represents the slowest speed setting. Conversely, the image of the hare represents the fastest speed setting.
Key Switch
Insert the key into the key switch and turn it clockwise to power your scooter up (turn on). Likewise, you turn the key counterclockwise to power down (turn off) your ECV.
WARNING! The electronic brakes will engage if the key is turned to the “off” position while your scooter is in motion. However, you will come to an abrupt stop!
Battery Condition Meter
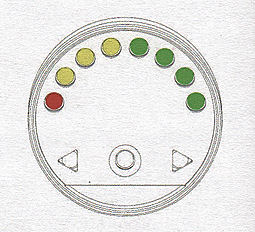
When the key is fully inserted and turned clockwise to power up your scooter, the Battery Condition Meter indicates the approximate battery voltage strength. This meter on the tiller console indicates the estimated strength of your batteries using a color code. For example, green indicates fully charged batteries from right to left, yellow indicates a draining charge, and red indicates that an immediate recharge is necessary.
Status LED
The status LED alerts you to electrical problems that may occur with the scooter. The LED will remain lit continuously while your ECV is on. The status LED will flash a code if you develop an electrical problem. Then it’s time to call the rental company for help!
Lights Switch
This switch controls your scooter’s lighting system. Toggle the switch forward to turn on the front lower light and rear running lights. Toggle the switch rearward to turn the lights off. By the way, my rented scooter only had one light toggle switch! You’ll notice that the line drawing pictured above has multiple light switches.
Throttle Control Levers
These levers allow you to control your scooter’s forward speed and reverse speed up to the maximum speed you preset with the speed adjustment dial.
To Move Forward, use either of the following: Use your left thumb to push the left side of the throttle control lever. Similarly, use your right-hand fingers to pull back on the right side of the throttle control lever.
To Move Rearward, use either of the following: Use your right thumb to push the right side of the throttle control lever. Likewise, use your left-hand fingers to pull back on the left side of the throttle control lever.
Release the throttle control lever and allow your scooter to come to a complete stop before engaging the other side of the lever. Lastly, when the throttle control lever is released, it automatically returns to the center “stop” position and engages your scooter’s brakes.
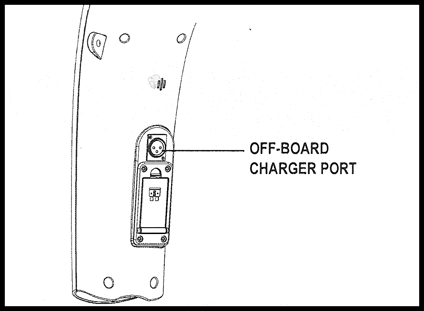
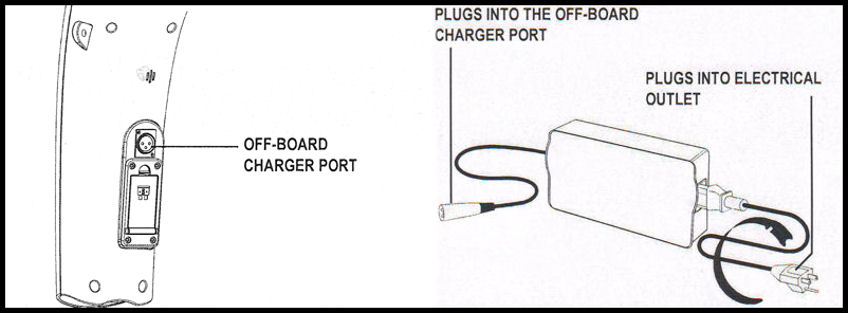
Off-Board Charger Port
The off-board charger power cord plugs into this port during battery charging. The off-board charger port is on the rear side of the tiller. It’s just below the tiller handle.
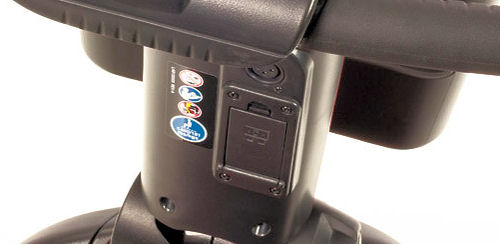
Electrical System Fuses
The fuse compartment is also located directly beneath the port. Your scooter has a series of electrical system fuses, which help protect the off-board charging system, key switch, and lighting system from overloading electrical current. These fuses are the same type used in automobiles and are in a compartment on the tiller.
Operating The ECV Manual Freewheel Lever

Whenever you need or want to push your scooter for short distances, you can put it in freewheel mode:
1. Remove the key from the key switch.
2. Push forward on the manual freewheel lever to disable the drive and brake systems. It will enable you to push the scooter.
3. Pull back on the manual freewheel lever to reengage the drive and the brake systems and take your scooter out of freewheel mode.
WARNING! When your scooter is in freewheel mode, the braking system is disengaged:
1. Disengage the drive motors only on a level surface.
2. Remove the key from the key switch.
3. Always stand to the scooter’s side to engage or disengage freewheel mode. Never sit on the ECV to do this.
4. After pushing your mobility scooter, always return the freewheel lever to the drive mode to lock the brakes.
NOTE: If the scooter is placed in freewheel mode (manual freewheel lever forward) while the key is in the “on” position, the scooter will not run until the manual freewheel lever is pushed backward. The key is turned to the “off” position, then back to the “on” position.
Battery Charging Procedures For The Mobility Scooter
Make sure that you always charge your batteries overnight before you operate the mobility scooter. Follow these six easy steps to charge your batteries safely:
1. First, position the front of your scooter close to a standard electrical outlet.
2. Remove the key from the key switch.
3. Make sure the manual freewheel lever is in the drive position.
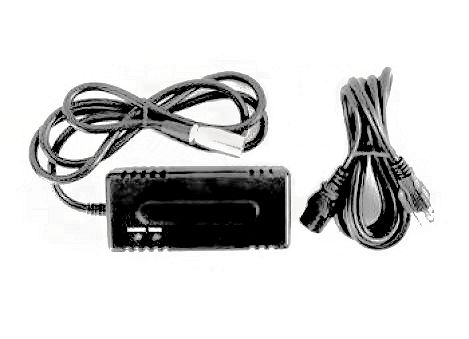
4. Plug the 3-pin charger power cord into the off-board charger port.
5. Extend the charger power cord and plug the molded end directly into the charger. Then connect the three-prong plug to an electrical outlet. Above all, never use an extension cord. The recommendation is to charge the batteries for 8 to 14 hours. Do so every night, especially after all-day use.
6. Unplug the power cord from the electrical outlet and the off-board charger port when the batteries are fully charged. Finally, you are now ready to operate your mobility scooter safely.

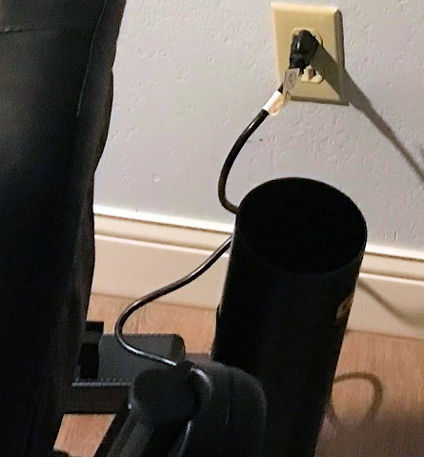
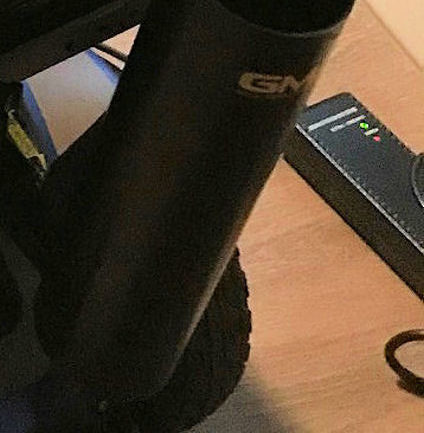
Hopefully, you can see the images above clearly enough. I’ve taken pictures from two scooters illustrating my point. The first shows the charging cord leading from the charger towards the off-board charger port on the tiller. Unfortunately, you can’t see it plugged in. Next, the image you’ll see is the charger plugged into an electrical outlet. There are two lights on the charger, and they will both appear “red,” indicating charging at this time. When charging is complete, the charger will have one show “red” and the other “green.” The scooter batteries are now fully charged at this point.
In Conclusion
In conclusion, please take all steps necessary to operate the mobility scooter safely and responsibly. Failure could cause personal injury, injury to others, component damage, or equipment malfunction.